This is a quick guide to get you started. If you have not used Meet Your Wardrobe before, or don’t have any products added then a good starting point would be our guide to Getting Started with MYWardobe here.
So why create a Private Shared Wardrobe? There are a number of reasons, a couple of the popular ones:
1. You are a professional in the fashion industry (a designer, stylist, PR, etc) and need to share or loan out products on a regular basis either for free or for a fee. In this scenario MYW allows you to do so in a private and audited manner. Only people you provide access to have access to see what’s in your shared wardrobe and make a request. It is easy to provide access, and it is also easy to take access away if a person doesn’t need access to your shared wardrobe anymore.
2. You are a fashion tastemaker and many people in either your immediate circle of friends or broader social circle regularly borrow or loan from you. Like in the previous point, MYW allows you to provide access in a more robust and audited manner. Allowing you to keep track of what has been loaned out. Plus giving you the option to provide or revoke access easily.
If you have any questions at all regarding the functionality please drop me a message through the Contact page.
When you first log in you are met with this set of Menus and Buttons. So far so good, but everything is blank! Great, you are now ready to start adding products to your Wardrobe…
Step 1) The Wardrobe section of the platform is private to you… everything that has a sub-status of In Wardrobe cannot be seen by anyone other than you!
i. To begin with, select the product by selecting the Action checkbox.
ii. Now click on the Assign to Shared Wardrobe Button.
And that’s it! It will now be viewable in your Shared Wardrobe.
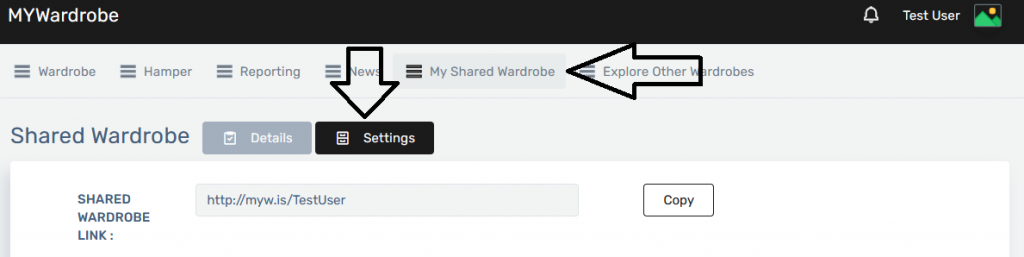
Step 2) Now that you have your products in your Shared Wardrobe, it’s time to let everyone know!
i. Click on the My Shared Wardrobe Button to take you to your Shared Wardrobe details page
ii. Now click on the Settings Button.
And voila! You will see your dedicated link that allows people to request access to and view your Shared Wardrobe (once you’ve granted access)
You can now share this link with people who need access to your shared wardrobe.
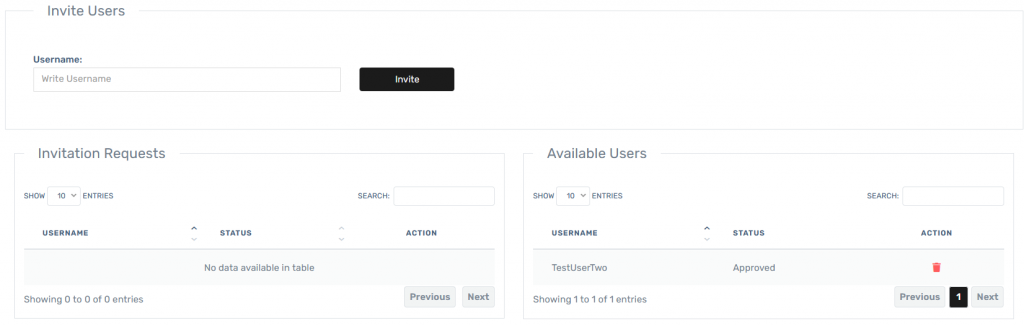
Step 3) Still on your Settings page. As people begin requesting access to view your shared wardrobe you will start seeing the Invitation Requests section start to populate with the requests.
For each access request you have the option to Accept [tick], Reject [cross] or View more info [eye].
Step 4) If you decide to accept the request in the previous step than the user accepted would move across to the Available Users section which determines who has access to your Shared Wardrobe.
In the future if you want to revoke access for any reason, all you have to do is find the user on the list and click the Bin icon.
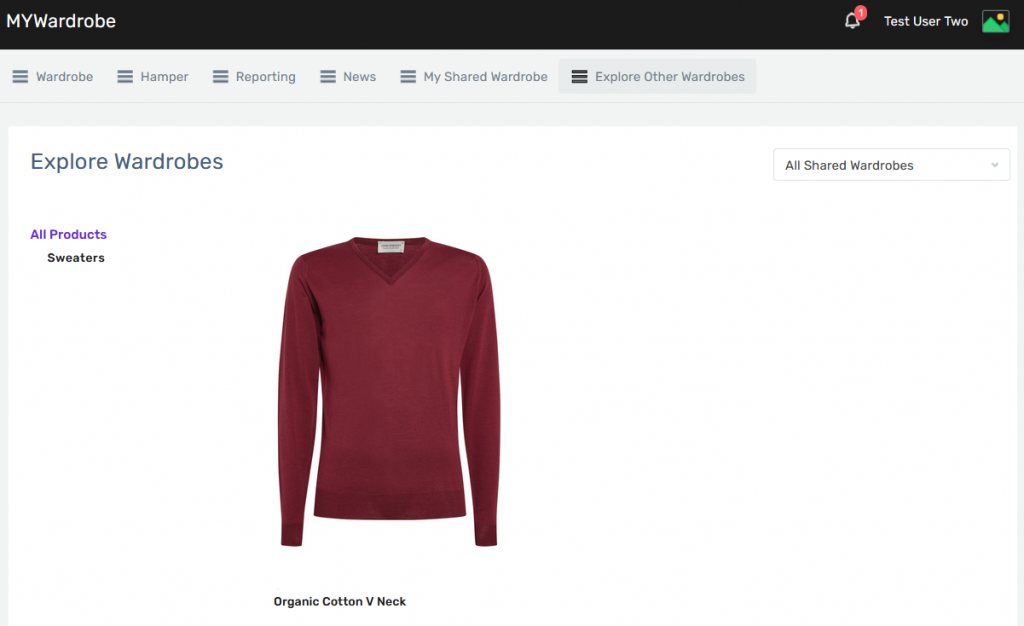
Step 5) As you start adding your products to your shared wardrobe, users that have access to it will be able to view them as shown here.
Step 6) On clicking on a product on the main page, they will be able to send over a rental request by suggesting dates and sending a rental request. You then have the option to approve or reject the request.
And that’s it! A shared wardrobe is only a few clicks away…
We use cookies on our website to give you the most relevant experience by remembering your preferences and repeat visits. By clicking “Accept”, you consent to the use of ALL the cookies.
This website uses cookies to improve your experience while you navigate through the website. Out of these, the cookies that are categorized as necessary are stored on your browser as they are essential for the working of basic functionalities of the website. We also use third-party cookies that help us analyze and understand how you use this website. These cookies will be stored in your browser only with your consent. You also have the option to opt-out of these cookies. But opting out of some of these cookies may affect your browsing experience.
Necessary cookies are absolutely essential for the website to function properly. These cookies ensure basic functionalities and security features of the website, anonymously.
Cookie
Duration
Description
cookielawinfo-checbox-analytics
11 months
This cookie is set by GDPR Cookie Consent plugin. The cookie is used to store the user consent for the cookies in the category "Analytics".
cookielawinfo-checbox-functional
11 months
The cookie is set by GDPR cookie consent to record the user consent for the cookies in the category "Functional".
cookielawinfo-checbox-others
11 months
This cookie is set by GDPR Cookie Consent plugin. The cookie is used to store the user consent for the cookies in the category "Other.
cookielawinfo-checkbox-necessary
11 months
This cookie is set by GDPR Cookie Consent plugin. The cookies is used to store the user consent for the cookies in the category "Necessary".
cookielawinfo-checkbox-performance
11 months
This cookie is set by GDPR Cookie Consent plugin. The cookie is used to store the user consent for the cookies in the category "Performance".
viewed_cookie_policy
11 months
The cookie is set by the GDPR Cookie Consent plugin and is used to store whether or not user has consented to the use of cookies. It does not store any personal data.
Functional cookies help to perform certain functionalities like sharing the content of the website on social media platforms, collect feedbacks, and other third-party features.
Performance cookies are used to understand and analyze the key performance indexes of the website which helps in delivering a better user experience for the visitors.
Analytical cookies are used to understand how visitors interact with the website. These cookies help provide information on metrics the number of visitors, bounce rate, traffic source, etc.
Advertisement cookies are used to provide visitors with relevant ads and marketing campaigns. These cookies track visitors across websites and collect information to provide customized ads.